每当看见新的东西,心很快就动起!念头当然很想去将它败回来!爱上烘焙(还要有成就感那种喔)美美蛋糕要式!总是看了食谱迫不及待驾车子买齐食材立刻开动!这个“日式芝士蛋糕”也不例外!到了LiShuan那而“哇!”蛋糕的整体和拍摄全都被吸引!是不是有点夸张了哈!因为自己没那么好的条件夸少许没关系啦!
前些日子都有烘芝士蛋糕,可以称“它”为发糕!烘好很开心!女儿立即就要求取出闻那浓浓的芝士味道!哈!蛋糕烘好原来发起有如发糕般的样子!虽外貌不一但味道却被女儿和儿子吸引!上校囖!包裹好蛋糕在车子里到了校门孩子道:妈咪!蛋糕吃完了!
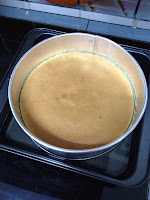 |
| 蛋糕还在“水池”里 |
 |
| 8寸模蛋糕不会高 |
 |
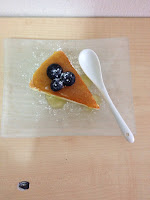
| 蛋糕表面蛮满意 |
材料:
200g奶油奶酪(cream cheese), 室温
30g 细砂糖
30g 无盐奶油, 室温
3个蛋黄
100ml动物性淡奶油( heavy whipping cream)
5ml 柠檬汁
5ml 蓝姆酒 ( 我换利宾拿)
30g 低筋面粉
10g 粟米粉
3粒 蛋白
50g 细砂糖
2大匙apricot jam + 1 大匙水


做法:
1 在活底模(18cm模)(我用8寸圆模), 底部垫一张大小合适的油纸。用一张锡纸将模子底部包起来,防止水浴烤的时候底部进水。
2 用搅拌器(balloon whisk)将奶油奶酪和30g糖打至无粒状。加入牛油,继续打至油滑。逐一加入蛋黄搅匀。然后加入奶油搅拌均匀。
3 调搅拌器最慢速,加入加入柠檬汁和蓝姆酒搅拌均匀后一次过拌入事先过筛两篇的低筋面粉和粟米粉。混合均匀既可。(或用橡皮刮刀将粉类低筋拌入奶酪糊里)。
4 接下来打发蛋白。用打蛋器把蛋白打发到呈鱼眼泡形状时,加入1/3的糖并继续搅打。
5 把蛋白打到比较浓稠的状态,再加入1/3糖。再打到表面开始出现纹路的时候,加入剩下的
1/3糖。直到把蛋白打发到接近硬性发泡的程度即可。(不要打到硬性发泡)
1/3糖。直到把蛋白打发到接近硬性发泡的程度即可。(不要打到硬性发泡)
6 打发好的蛋白,提起打蛋器以后,拉出一个尖尖的角。角的顶端有稍微的弯曲。这个状态就
可以了。
可以了。
7 挖1/3蛋白到乳酪糊里,用橡皮刮刀把蛋白和乳酪糊拌匀。注意搅拌的手法:从底部向上翻拌。绝对不可以打圈搅拌,否则打发好的鸡蛋会严重消泡,直接导致蛋糕的回缩或者塌陷,甚至无法膨发。
8 将蛋白和乳酪糊拌匀以后,全部倒回蛋白碗里。
9 继续用橡皮刮刀把蛋白和乳酪糊拌匀。记住,不要打圈搅拌。
10 把拌好的蛋糕糊倒入蛋糕模里。
在烤盘里注水,大概3CM的高度的滚水。
11 把蛋糕模放入烤盘里(直接放在水里),把烤盘放进预热好的烤箱下层,150 C烘30分钟,转140 C 烘60分钟。直到表皮均匀上色,蛋糕彻底凝固,用手压上去没有流动的感觉时,即熟
透。
透。
12 把烘炉门稍微开启,让蛋糕在炉里慢慢降温15分钟(避免忽然降温蛋糕下榻)。
13 刚出炉的蛋糕较脆弱,不要立即脱模。待其自然冷却后再脱模。
14 用一小碗装入果酱和水,微波炉叮热10秒,搅匀,涂抹果酱在蛋糕表面。放入冰箱,冷藏4个小时以上再切块食用。
原食谱(日语):Cookpad,
英文食谱参考:Nami - justonecookbook
英文食谱参考:Nami - justonecookbook


